10 tips to photograph amphibians and reptiles in-situ
Articles | Macro photography tips
By Alejandro Arteaga and Chien Lee. February 2019.
As a nature photographer, you want to create striking images of amphibians and reptiles while showing their natural undisturbed behavior. This is no easy task, but here is a list of ten tips that will help you consistently create eye-catching in-situ images of herps.
1. At night, use an off-camera radio-triggered flash. There are many ways to illuminate a nocturnal creature, but using an off-camera flash that is triggered by radio signal is perhaps the best to do it creatively while minimizing disturbance to the animal. Since the flash is not mounted on the camera, you can move it freely to create an astounding variety of lighting-effects, and since there are no chords connected to it, you are less likely to disturb the vegetation around the subject. We like the Canon 600EX II-RT, the Nikon SB-900, and the Yongnuo YN600EX-RT II.

Adult male Red-eyed Dwarf-Iguana (Enyalioides oshaughnessyi) "roosting" on a stem. Milpe, Ecuador. Photo by Alejandro Arteaga.
2. For a more personal perspective, try to get eye-level with your subject. Don't be afraid to get on the ground and get dirty!
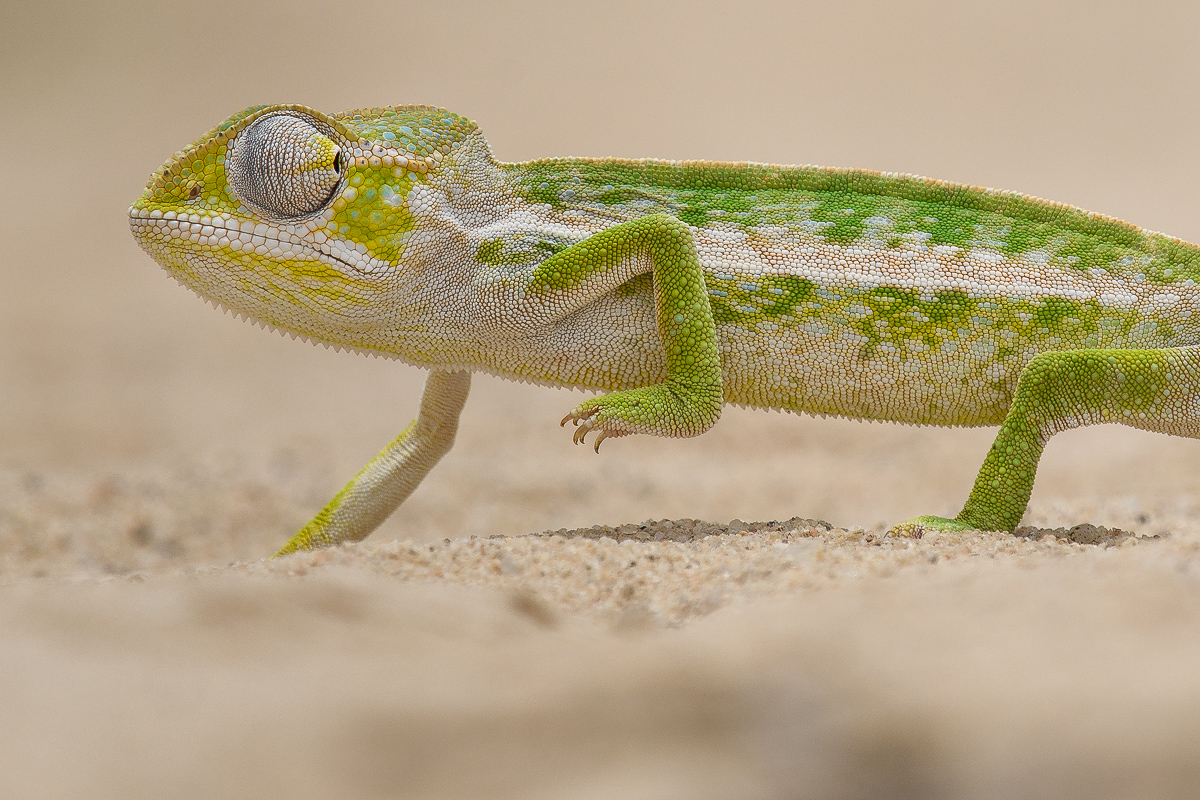
Greater Carpet-Chameleon (Furcifer major). Isalo National Park, Madagascar. Photo by Chien Lee.
3. Remember that your subject doesn't have to be in the center of the image. Positioning your subject off-center can help to strengthen the composition and encourage the viewer to explore the entire image. It also lets you include additional important elements in the frame, like the environment where the animal lives.

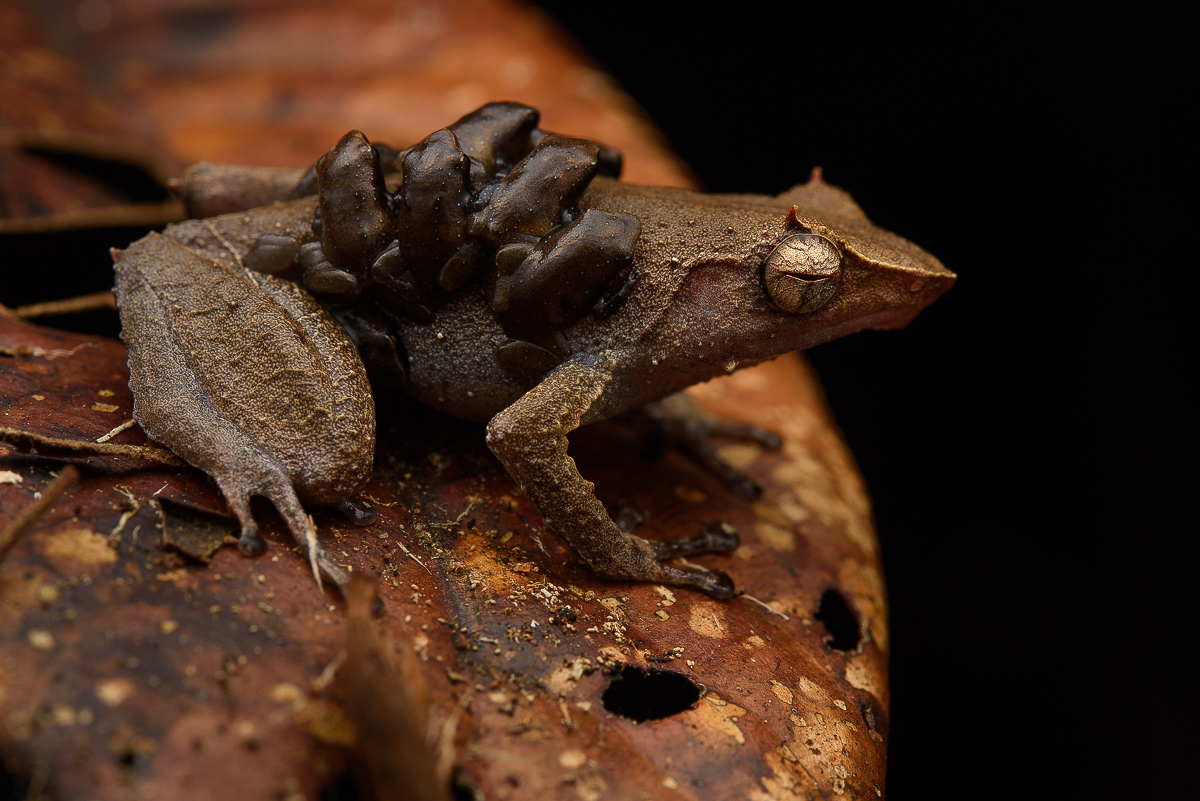
A Mossy Leaf-tailed Gecko (Uroplatus sikorae) perfectly camouflaged on a woody liana. Ranomafana National Park, Madagascar. Photo by Chien Lee.
4. Always keep in mind how your presence might be threatening to the subject. Remember that the less you disturb your subject the more likely you will be able to witness and photograph natural and unusual behaviors.

Black-headed Cat-Snake (Boiga nigriceps) preying on a Harlequin Gliding-Frog (Rhacophorus pardalis). Kubah National Park, Borneo. Photo by Chien Lee.
5. Shoot in the rain. Rainfall triggers reproduction in amphibians. You can capture this activity while protecting your equipment. Use a plastic rain cover or have an assistant hold an umbrella over your gear.

Pair of Cattle Treefrogs (Smilisca phaeota) in amplexus. Guayacán, Costa Rica. Photo by Alejandro Arteaga.
6. Use a diffuser on your flash to soften the light. This can be a ready-made softbox or something you can simply make yourself with plastic and foam. This is especially important for subjects that are very shiny and reflective.
Adult male Spike-browed Frog (Sphenophryne cornuta) back-riding froglets. Digul River, New Guinea. Photo by Chien Lee.
7. Use a snoot. Although attaching a softbox to your flash will be wise for most situations, there are others when another light modifier, the snoot, will work wonders. The snoot is essentially a funnel that you attach to the flash in order to have the light concentrated in just a part of the image. It works great when the animal you are photographing is sitting on a substrate brighter than itself. In those cases, the snoot will only light the subject, thus making it the most important part of the image.
Pair of Warrior Rainfrogs (Pristimantis bellator) hiding in a bromeliad. Tapichalaca Reserve, Ecuador. Photo by Alejandro Arteaga.
8. Light creatively. If you are using an off-camera flash, try experimenting with light from different angles to change the mood of the scene. Sometimes you may even need to use your flash as a backlight.

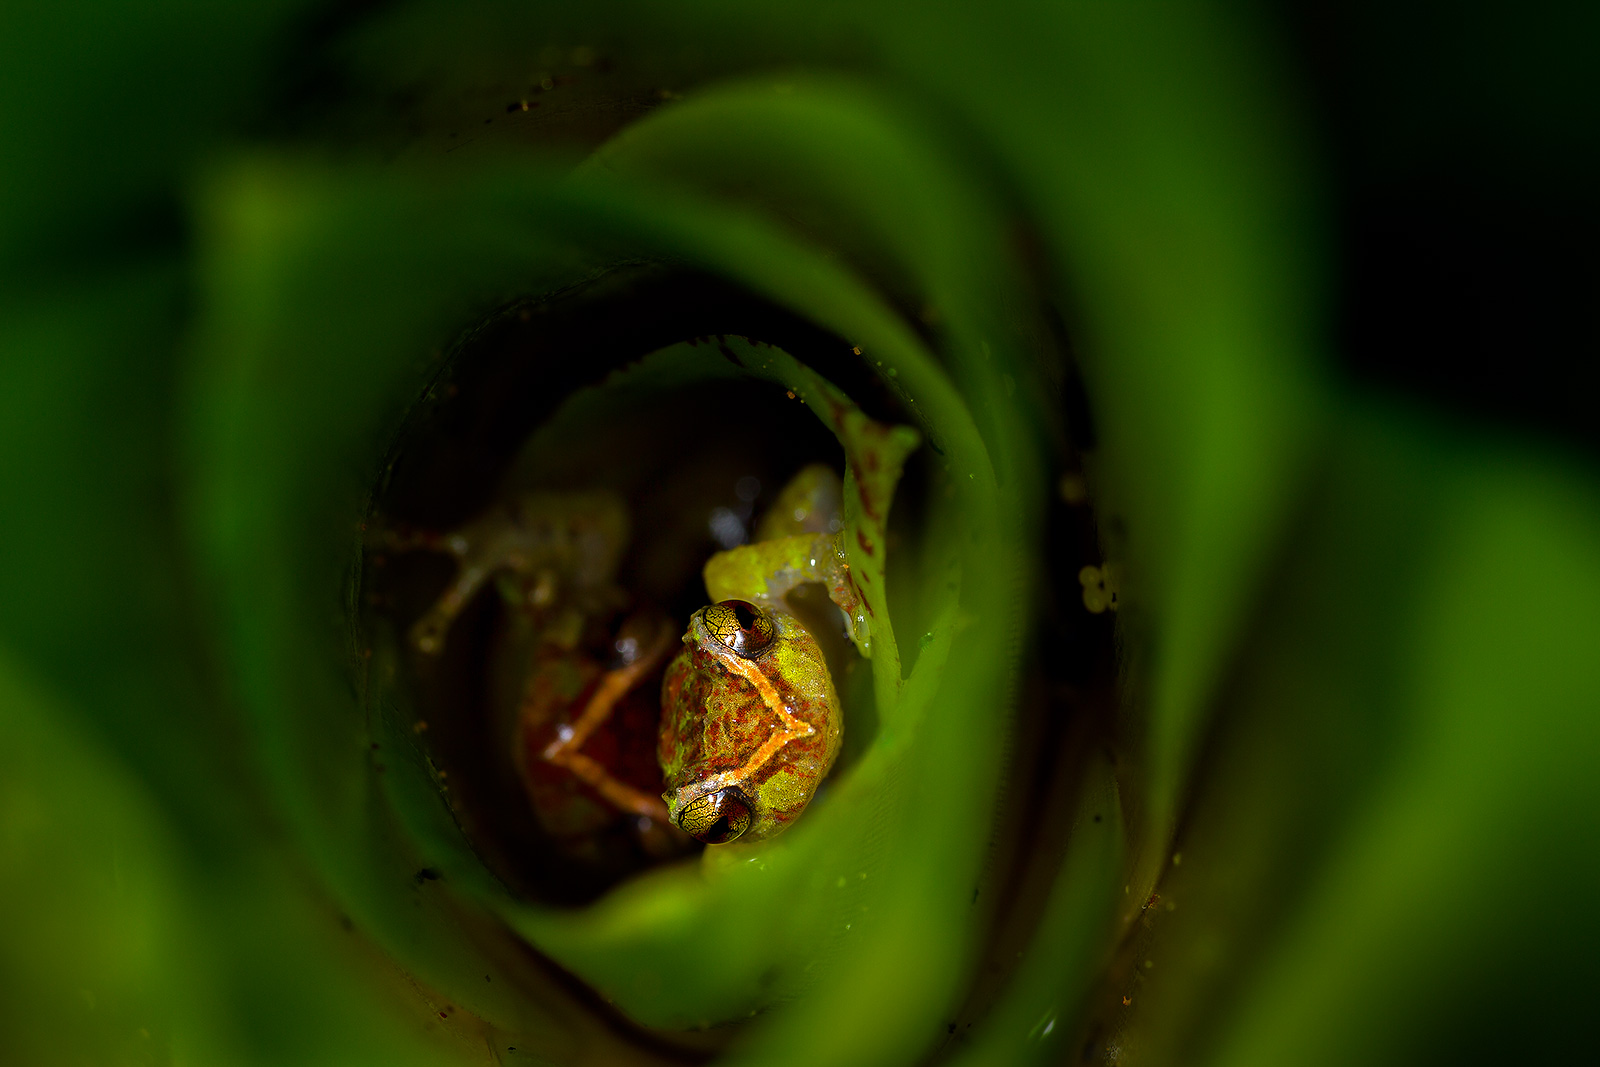
Undescribed Bush-Frog (Philautus sp. nov.) hiding in a pitcher plant. Pulong Tau National Park, Borneo. Photo by Chien Lee.
9. Have a biologist/photographer help you. Being in the field with a biologist gives you the two-fold advantage of predicting where striking animal behaviors might occur, and how each species will react to being approached for photography. If the biologist is also a wildlife photographer, then he can also make your life easier by holding and strategically placing your light source while you focus on other creative aspects of the photo shoot.

Silhouette of an Equatorial Anole (Anolis aequatorialis) being bit by a mosquito. Mindo, Ecuador. Photo by Alejandro Arteaga.
10. Pre-test your camera settings. Be aware that your first picture might be the only picture. Some animals, like chameleons, will change color upon the first firing of the flash. Others will just flee. If you are aware of this fact, your best strategy is to test your camera settings as well as your light output on a nearby inanimate subject before actually engaging with the subject.
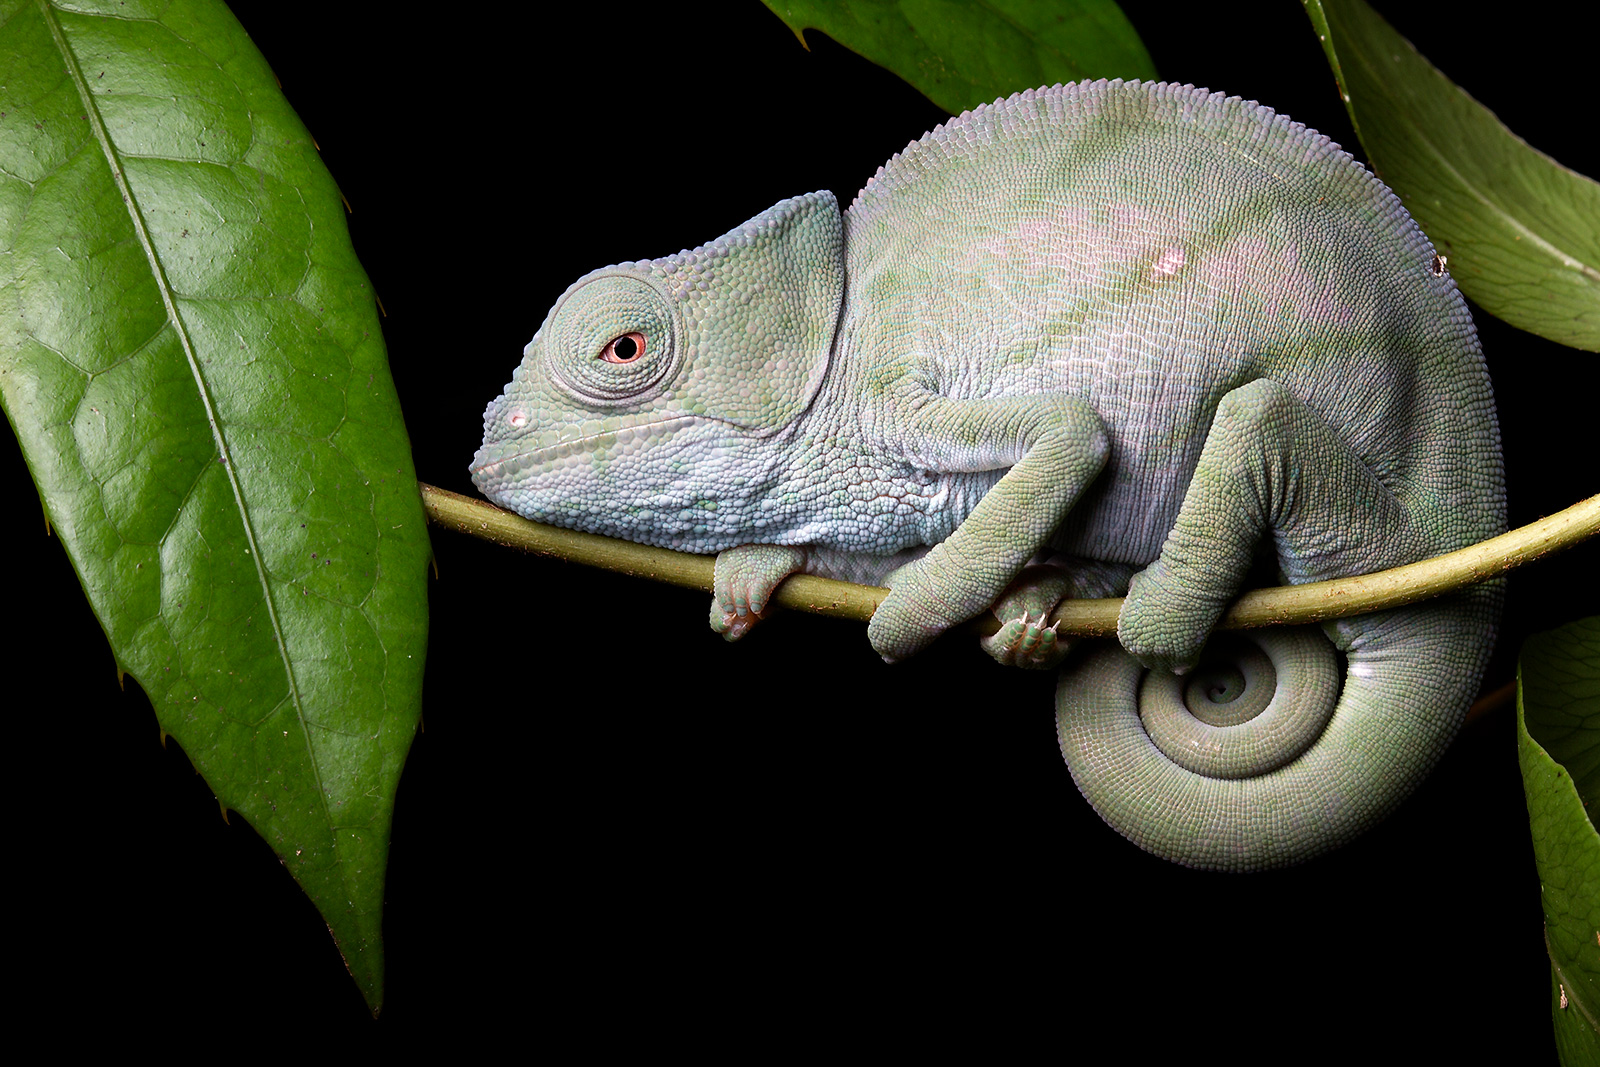
Juvenile Parson's Chameleon (Calumma parsonii) sleeping on a leaf. Andasibe-Mantadia National Park, Madagascar. Photo by Alejandro Arteaga.
Final thoughts. The perfect in-situ shot is a reward for your passion and perseverance. If you find an amphibian or reptile in a less than ideal photographic position, photograph it as is, and continue searching for other subjects until you find that special once in a lifetime subject and situation. With a lot of effort, patience, and passion, eventually you will achieve a perfect in-situ shot.
Want to learn more? Join our crew in the field and learn directly from them.
Follow Alejandro. 
Follow Chien.